Time for my Personal Website #
For a long time I wanted to create my personal website but never found the time to do so. It came back up when we started working together with Christian Baumgartner and I saw his personal website hosted via GitHub Pages. Since GitHub Pages makes the hosting of a static website painless, at least from a developer perspective, I finally found the motivation to make time to set up my personal website.
HTML Templates #
At first, I was only planning on setting up an online CV. If you also do not want to design your personal website from the ground up, then search for existing HTML templates online is a great way to save a lot of time. One of the criteria for what I was looking for was a responsive single page design. The Online CV template on UICOOKIES fit all requirements and the design looked nice to me.
Content Management #
The HTML code is well-structured but very repetitive. While a CV does not change frequently to warrant some form of content management solution, I was also thinking about adding a blog (more on this below). Via Jeremy Howards tool fastpages I learned of Jekyll and its integration with GitHub Pages. Jekyll can generate static HTML web pages via GitHub actions from content and layout documents. It feels like a content management tool for software developers. Converting an existing HTML page to Jekyll took some time but was straight forward following this guide.
Custom Domain #
The default URL spenhouet.github.io with GitHub pages is fine but I just wanted to have my own domain. It is shorter and looks a bit more professional. It also hides that this web page is hosted by GitHub. Based on recommendations online, GoDaddy seems to be a good choice to get your personal domain address. There, you can search for available domain addresses for different top-level domains. I decided for spenhouet.com. This comes with a cost which is based on the address itself and the time you want to reserve it. To configure my custom domain for my GitHub pages site, I followed the GitHub documentation and this guide by Rich Pauloo.
HTTPS #
For a more trustworthy website I also enabled HTTPS following the GitHub documentation.
Adding a Blog #
Did you ever wanted to do something you already did in the past but had no or very little recollection on how you did it last time around? You might create repositories, save links or store text files on a folder on some drive. The first challenge is to find it and the second to make sense of it. I felt the need to have something more structured where I can document things I did to recollect them later.
Documenting via Markdown files is convenient and reminds me of working with LaTeX. kramdown automatically renders these posts in HTML and styling is done via CSS files. Jekyll and GitHub then publish these posts on my own blog to share with others.
For my blog posts I wanted to keep the existing theme of this website. The implementation of blog functionality via Jekyll is guided by startbootstrap-clean-blog-jekyll project. You can view their example blog here.
The styling of the blog post content is based on the GitHub Markdown CSS and the GitHub Code Highlight CSS. The code highlight CSS can be created via:
rougify style github > github-highlight.css
Every blog post uses a permalink of the following format:
/blog/:categories/:year/:month/:day/:title/
The jekyll-toc project provides a ready to use include to display a table of content (ToC) for each blog post. The jekyll-anchor-headings project provides a ready to use include to add anchor links to headings.
Working with Jekyll #
Working on a Jekyll project with VScode on Windows required some additional steps.
Jekyll on WSL2 #
The easiest way for me to run Jekyll on Windows was to run it via the WSL2. For this you can install Ubuntu 20.04 via the Microsoft Store.
As a first thing before installing software, it is a good idea to do a system update.
sudo apt update
This fails to resolve any Ubuntu server.
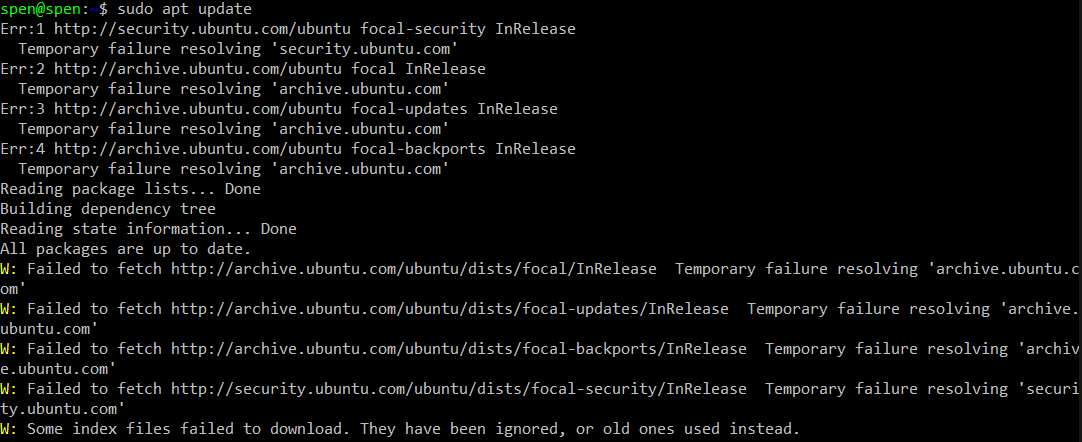
This is due to an issue with the DNS resolution from inside the WSL.
Fixing WSL2 DNS resolution #
That the DNS resolution does not work from inside the WSL is something I encountered multiple times. There are many open issues on microsoft/WSL regarding this, like #4246, #4277, #4285 and #5336.
It is not only Ubuntu server but also other addresses can not be resolved e.g.:
ping www.google.de
I did follow the suggestions made here and here. The following steps solved it for me.
-
In WSL create or edit the file
/etc/wsl.conf.sudo nano /etc/wsl.conf -
Put the following in
/etc/wsl.confto keep the/etc/resolv.conffrom being overwritten.[network] generateResolvConf = false [automount] enabled = true options = "metadata" mountFsTab = false -
Open a CMD window and shutdown the WSL
wsl --shutdown - Restart the WSL
-
In WSL set the Google DNS server as nameserver in
/etc/resolv.conf.echo "nameserver 8.8.8.8" | sudo tee /etc/resolv.conf - Shutdown and restart the WSL again (step 3. and 4.)
If you continue having issues, this could also be due to another reason.
Make sure that the folder /AppData/Local/Temp is uncompressed.
Open the folder properties of /AppData/Local/Temp and open the extended section.
Make sure that the compression option is deselected.
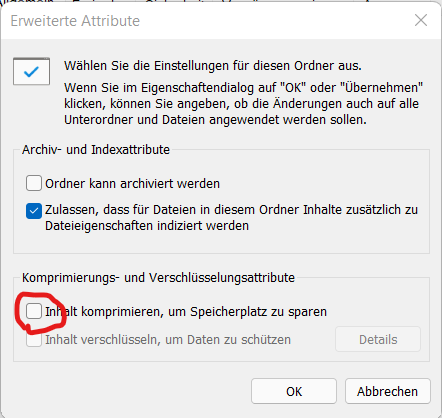
Confirm the change. This process might take some time.
Install Jekyll on WSL2 #
As we are using the Ubuntu distro on WSL2 we can follow the official installation guide for Jekyll on Ubuntu.
-
Install all Jekyll dependencies:
sudo apt-get install ruby-full build-essential zlib1g-dev -
Set up Ruby Gem installation directory for your user folder:
echo '# Install Ruby Gems to ~/gems' >> ~/.bashrc echo 'export GEM_HOME="$HOME/gems"' >> ~/.bashrc echo 'export PATH="$HOME/gems/bin:$PATH"' >> ~/.bashrc source ~/.bashrc -
Install jekyll:
gem install jekyll bundler -
You can now install the
Gemfile.bundle install
Serve Jekyll with VScode #
As reported here, on Windows the auto detection of file changes via the jekyll serve --watch option does not work.
For me the following command worked reliably:
bundle exec jekyll serve --force_polling
You can run this command in a terminal and view your page on http://127.0.0.1:4000/.
When using VScode we can make this a bit more convenient by configuring a task to serve the Jekyll page and a launch config to run this task and open the page in Edge. For this you can follow the VScode documentation on tasks and on the launch configuration.
For the task we can simply put the command from above into a task configuration.
{
    "label": "Jekyll serve",
    "type": "shell",
    "command": "bundle exec jekyll serve --force_polling",
    "presentation": {
        "reveal": "always",
        "panel": "dedicated"
    },
}
The presentation option configures the terminal output to show up and to reuse the existing terminal on multiple starts of this task.
Since this will stay active we want to mark it as background-task.
{
    "isBackground": true,
    "problemMatcher": {
        "background": {
            "activeOnStart": true,
            "beginsPattern": "^\\s*Jekyll Feed: Generating feed for posts",
            "endsPattern": "^.*done in"
        },
    }
}
With beginsPattern and endsPattern we specify when we consider this background task to be active i.e. when it starts and stops running.
For the serving command we can take the start and end of the regeneration after a file change was detected.
VScode can also scan Jekyll warnings and exceptions by defining a pattern for the problemMatcher.
{
    "problemMatcher": {
        "fileLocation": [
            "relative",
            "${workspaceFolder}"
        ],
        "pattern": [
            {
                "regexp": "^\\s*Liquid (Warning|Exception):.*line (\\d+)\\): (.*) in (.*)$",
                "severity": 1,
                "line": 2,
                "message": 3,
                "file": 4,
            }
        ],
    }
}
This will show problems in the problems tab (CTRL+SHIFT+M). VScode can then directly jump to the affected code. This is not perfect since the code line reported by Jekyll seems to be unaware of the file header section and therefore has a relative offset.
Here is the full task configuration:
{
    "version": "2.0.0",
    "tasks": [
        {
            "label": "Jekyll serve",
            "type": "shell",
            "command": "bundle exec jekyll serve --force_polling",
            "presentation": {
                "reveal": "always",
                "panel": "dedicated"
            },
            "isBackground": true,
            "problemMatcher": {
                "owner": "jekyll",
                "fileLocation": [
                    "relative",
                    "${workspaceFolder}"
                ],
                "pattern": [
                    {
                        "regexp": "^\\s*Liquid (Warning|Exception):.*line (\\d+)\\): (.*) in (.*)$",
                        "severity": 1,
                        "line": 2,
                        "message": 3,
                        "file": 4,
                    }
                ],
                "background": {
                    "activeOnStart": true,
                    "beginsPattern": "^\\s*Jekyll Feed: Generating feed for posts",
                    "endsPattern": "^.*done in"
                },
            }
        }
    ]
}
You can directly run this task via CTRL+SHIFT+B or as a preLaunchTask in a launch configuration.
You can use the launch configuration to launch a browser (e.g. Edge or Chrome) with a predefined URL.
We can use this to start our serving task in the background and to open our page in the browser as soon as it is ready.
Here you can see the respective launch configuration:
{
    "version": "0.2.0",
    "configurations": [
        {
            "type": "pwa-msedge",
            "request": "launch",
            "preLaunchTask": "Jekyll serve",
            "name": "Launch Jekyll page",
            "url": "http://127.0.0.1:4000",
            "webRoot": "${workspaceFolder}"
        }
    ]
}
Other Issues with Jekyll #
- GitHub pages does not use the newest version of Jekyll. Due to this, the sorting of collections through the config does not work.
- Jekyll includes still work when commented out. This can be very unexpected.
Future Improvements #
This blog is by far not perfect. The following improvements might be addressed in the future:
- There is currently no way to enlarge images. It would be good to have a modal window open up when an image is clicked. I would like to change the HTML generation for images by kramdown for this. This suggestion might also be a solution. For the modal I might go with lightbox.
- Adding share buttons without any tracking feature
- A way to return to the main page is missing. This might be implemented by adding a specific button or by integrating a navigation bar.
- The list of blog entries on the main page currently shows all blog posts. While there is only this one or a few this is not an issue but there will be some paging or limit required.
There will be no new blog posts on this topic. I might update this one instead.
Disclaimer #
While this code is open source, it is not free. I paid for licenses or made sure to attribute. You can follow this post, feel free to take a look at the source code and use both as guide. Fulfilling copyright and licenses is your own responsibility.